|
<< Click to Display Table of Contents >> Gekcel guided tour |
  
|
|
<< Click to Display Table of Contents >> Gekcel guided tour |
|
In the previous section on Gekcel basics, the basic ideas behind the Gekcel add-in for Excel were explained.
In the current section we will go through a simple practical example step by step. In the example, we will create some timeseries in Gekko (remote-controlled from Excel/Gekcel), transfer these to Excel, change them in Excel, and transfer them back to Gekko.
First you need to "install" Gekcel. To download and install, do the following:
1.Download the Gekcel.zip file. If in doubt, take Gekcel.zip from the latest development version (here). If you are using Excel 32-bit: download Gekcel 32-bit, and if you are using Excel 64-bit: download Gekcel 64-bit. How to determine bitness of your Excel version?: +toggle.
On a 64-bit Windows pc, Microsoft Excel can be installed as either a 32-bit or 64-bit version. Until 2020, 32-bit was the default when installing Excel (or Office), so there are a lot of 32-bit Excel versions installed out there, also on 64-bit Window systems. Gekcel needs the same "bitness" as Excel to run, and to check the bitness of you current Excel versions, perform the following (for Excel 2013, 2016 or 2019): Select the 'File' tab from the Excel ribbon, select 'Account' and then 'About Excel'. The version and bit-level of Excel will be displayed in the top line of the window (for Excel 2010, you should select 'Help' instead of 'Account'). Excel 2007 and prior is always 32-bit.
|
2.Create a new separate folder for the Gekcel "installation", and unpack the files inside Gekko.zip into this folder.
3.From the "installation" folder, open the Gekcel.xlsm file (double click it). You may get a security warning about macros being disabled (activate these macros).
4.If you already have an older version of Gekcel installed, you may have to remove this older version manually first (probably this step can be skipped in most cases). This can be done from the File tab, click Options. Under Manage choose COM Add-ins in the drop-down and click Go. From there, you can choose Remove. Do this for all components with "Gekcel" in the name. After this, it is perhaps best to go to File tab, click Options. Under Manage choose Excel Add-ins in the drop-down (this is default), and click Go. Here, you can deactivate Gekcel in a checkbox.
5.From the "installation" folder, drag (in File Explorer/Windows Explorer) the file Gekcel.xll into the recently opened Gekcel.xlsm Excel spreadsheet (you may get a security warning: accept to activate the add-in). Alternatively if this does not work (perhaps because of security settings) you can do this: from the recently opened Gekcel.xlsm spreadsheet, click the File tab, click Options, under Manage choose Excel Add-Ins, click Go, and in the newly opened window, you can now browse for and select the Gekcel.xll file (click ok after that). If during this step there is an Excel window asking something like "Copy 'Gekcel.xll' to the Addins folder for [your name]?", answer no to that question (Gekcel depends upon other files thatn Gekcel.xll, so answering yes will cause problems). When Gekcel.xll is active on a spreadsheet, there is a "Gekko" tab at the Ribbon. In some cases, Windows marks the Gekcel.xll file as suspicious after being downloaded, but that mark can typically be removed by right-clicking Gekcel.xll in File Explorer, select "Properties", and under "Security" click "Unblock".
6.Close Gekcel.xlsm.
7.Optional. If you prefer, you may now take a copy of Gekcel.xlsm, and transfer it to some "working" folder of your choice. For new users, it is perhaps best to skip this step, to avoid potential folder issues. If you do make a copy, the copied Gekcel.xlsm should still remember the location of the other Gekko files (in the "installation" folder).
Note 1: Gekcel is a self-contained product bundle, containing all necessary Gekko files inside (including Gekko.exe etc.). Therefore, Gekcel runs completely independently of any normal Gekko installation (and vice versa), and the version number and bitness of Gekcel vs. Gekko installations may differ.
Note 2: When Gekko is called via Gekcel, the default working folder is always the same folder as the Excel worksheet resides in (in this example, Gekcel.xlsm). If this folder is read-only or if the folder cannot be identified, Gekko will use the desktop as working folder. Alternatively, you can set the working folder manually with the VBA statement Gekko "option folder working = g:\data\testing;" (for example).
Note 3: When trying to open/load Gekcel.xll, you may encounter a warning about the file format and the file being potentially corrupted. If opening anyhow, you may see something like the following:
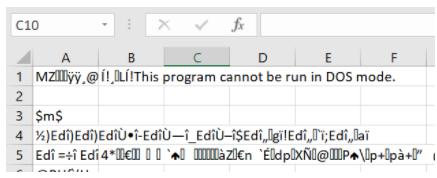
This is often an indication that the bitness is wrong: that you are either trying to use 32-bit Gekcel on 64-bit Excel, or vice versa. In that case, Excel will not provide any helpful explanation, but will just fail like shown above.
Open up the same Gekcel.xlsm again. It should hopefully remember Gekcel, and show a "Gekko" tab at the Ribbon. If not, you may have to drag Gekcel.xll onto Gekcel.xlsm again.
First, we will try to run the in-built Gekko_Demo() VBA subroutine inside Gekcel.xlsm. (A VBA subroutine is just a VBA function that does not return anything). To do this, you will first have to open up the Excel VBA editor.
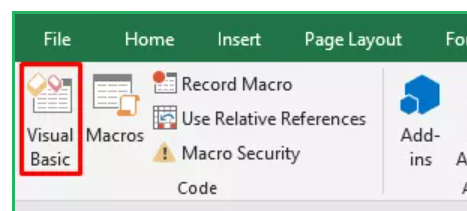
The VBA editor is found in the Developer tab, click the Visual Basic button. (If you do not see the Developer tab, go to File --> Options --> Customize Ribbon and make sure that "Developer" is checked in the right pane. Alternatively, you may use the Macros section of the View tab, but enabling the Developer tab is better.).
This should open up the VBA editor:
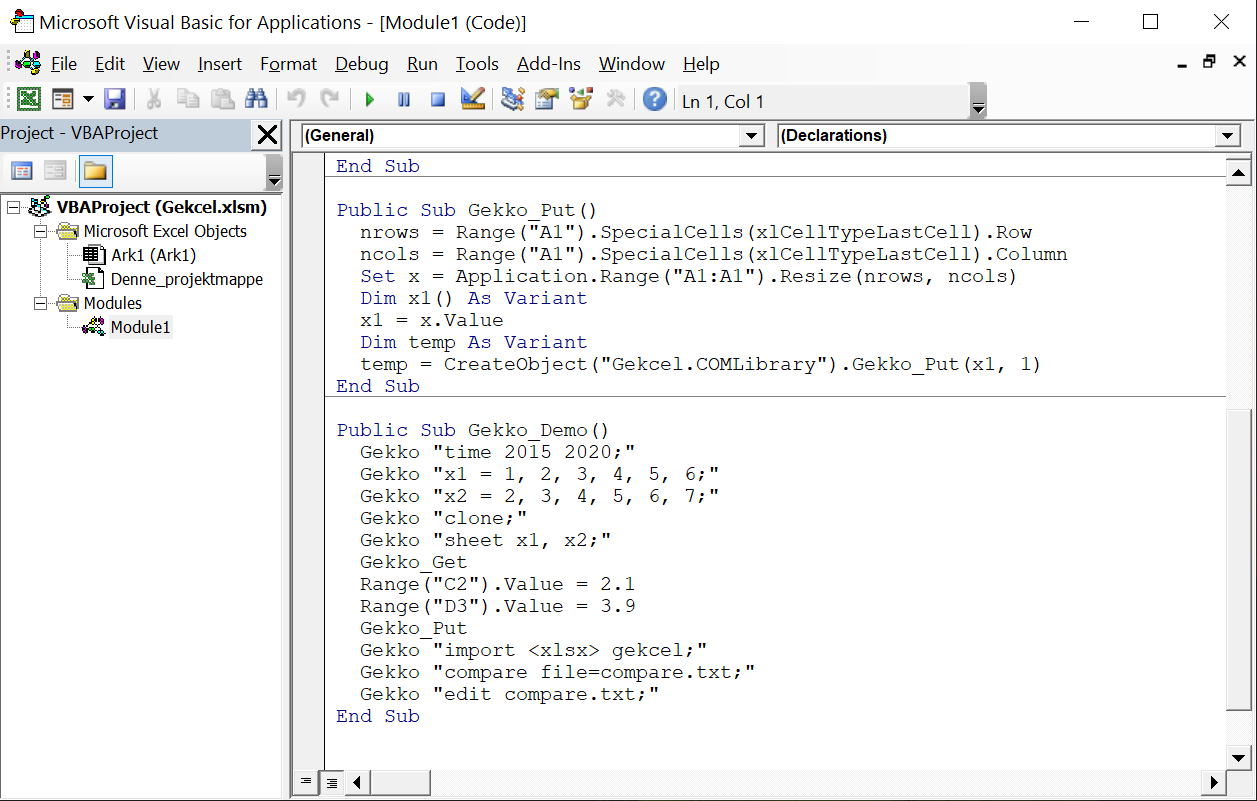
Near the bottom of the VBA editor, you should find the Gekko_Demo() subroutine:
Public Sub Gekko_Demo() |
The demo creates two annual timeseries x1 and x2 in Gekko, transfers them to the current Excel worksheet tab, changes two cells in that worksheet (corresponding to x1[2016] and x2[2017]), transfers the two timeseries back to Gekko, and finally compares the two timeseries to their original versions (in Gekko).
To run Gekko_Demo(), place the cursor somewhere inside the subroutine and press F5 or hit the "Run sub" green button. (This may fail with a "The macros in this project are disabled". To enable them, click the File tab, Options, Trust Center, Trust Center Settings, Macro Settings, activate them and click ok).
This will run the statements, and in the end, the file compare.txt is shown in Notepad (the file identifies the changes corresponding to the two altered cells C2 and D3). The compare.txt file looks something like this:
Out of the 2 common series, there are differences regarding 2 of them: |
In the Excel worksheet, you will see the following:

These are the values of x1 and x2 (with the two changes in cells C2 and D3 seen).
So, in VBA, you can just use the prefix Gekko followed by the Gekko statement inside double quotes ("), because you may omit the more strict function call parentheses (Gekko("time 2015 2020;")). In the same manner, you may use Gekko_Put instead of Gekko_Put(), and Gekko_Get instead of Gekko_Get(). Remember that Gekko statements must end with semicolon ;, otherwise you will get a syntax error!
The VBA Gekcel interface is quite simple to use, as the Gekko_Demo() example above illustrates. Beware however that if the databank used is shared between users on a common network drive, it may be better to use OPEN<edit> and CLOSE, rather than IMPORT/EXPORT or READ/WRITE. For instance:
Public Sub Gekko_Update() |
Using the statement pair open<edit>data; ... close data; is better than using for instance using read data; ... write data; because when open<edit> is used, Gekko will check the status of data.gbk when the databank is closed. If its last written date has changed since it was opened, Gekko will refuse to write the data back to the databank. This guards agains synchronization issues, for instance if another user has changed data.gbk after the open<edit> statement.
The subroutine could alternatively be split in two parts like the following:
Public Sub Gekko_Update1() |
Public Sub Gekko_Update2() |
Then Gekko_Update1() would load the data (here: series x1 and x2) from data.gbk into the spreadsheet, and when finished Gekko_Update2() would transfer the data back to data.gbk (while checking that data.gbk has not been tampered with).
The Gekko_Get() function used above obtains data fetched in a previous SHEET statement (Gekko "sheet ...;"). You may instead fetch the data in one go, using the more tailor-made Gekko_GetGroup() function.
The function is an array function that outputs an array of cells, and you must therefore use Ctrl+Shift+Enter to enter it (this is also called a "CSE formula"). To use it, first mark a two-dimensional range of cells where you want to show the data (for instance 4 rows and 6 columns somewhere in your sheet). Then try to enter the following formula, finishing with Ctrl+Shift+Enter. (It is assumed that the demo.gbk databank from the Gekcel.zip file is present in the same folder as the spreadsheet).
=Gekko_GetGroup("demo.gbk"; "a"; "2020"; "2025"; ""; ""; "x1, x2, x1/x2") |

The above results should be shown. Excel automatically inserts the {}-curlies after the Ctrl+Shift+Enter to indicate that this is an array function. Note that the year 2025 is not shown above, because only 6 columns were selected in the two-dimensional range. When using the Gekko_GetGroup() array function, if the selected area of Excel cells is too small to show the full results, the results are truncated. And if the area is too large, missing values (here: #I/T, in English Excel versions: #N/A) will fill out the area.
In the function call, the first argument is the Gekko databank, followed by the frequency of the data, and start and end periods. The fifth argument is an optional operator (try for instance "p" for percentage growth), whereas the sixth argument is for other options (not used at the moment). The last argument is the timeseries that are to be shown (separated by comma). Instead of one string at the end, you may alternatively use three strings separated by ; as shown here:
=Gekko_GetGroup("demo.gbk"; "a"; "2020"; "2025"; ""; ""; "x1"; "x2"; "x1/x2") |
You may use any legal Gekko-expressions, and wildcards should be stated like for instance {'a*b?c'} for a a*b?c wildcard. Labels can be set with single quotes. For instance:
=Gekko_GetGroup("demo.gbk"; "a"; "2020"; "2025"; "p"; ""; "{'x*'}"; "x1/x2 'ratio'") |

Here, x1 and x2 match the wildcard x*, and x1/x2 is shown with the label 'ratio'. The values are shown as percentage growth (because of operator "p"). If you use for instance "n p" instead of just "p", you will get both levels and percentage growth rates shown.
In essence, =Gekko_GetGroup("demo.gbk"; "a"; "2020"; "2025"; "n p"; ""; "{'x*'}"; "x1/x2 'ratio'") is translated into the corresponding Gekko statements: read demo.gbk; option freq a; time 2020 2025; sheet <n p> {'x*'}, x1/x2 'ratio';. You can see how this "translation" is done in the VBA function Gekko_GetGropup() inside the spreadsheet.
When used as above, Gekko will run silently, without showing any text messages while running.
To see Gekko text messages (including error messages) and issue Gekko statements in a more interactive fashion without VBA, you may alternatively activate and use the so-called "Immediate Window" in Excel. Read more about this in the next section.